Skip to main content
Quotation Entry
1. Create a new quotation
1.1. Creating a quotation without a job
- Navigate to the Quotes tab in the middle menu of the Company module (see more details in the Company quotation).
- Click the
 plus icon located in the quotes header.
 - All details — including Company, Contact, Billing, Shipping, and Tax (based on the Shipping Address) — will be automatically filled according to the company setup.
1.2. Creating a quotation in the job
- Navigate to the Quotes tab in the middle menu of the Job module (see more details in the Job quotation).
- Click the plus icon located in the quotes header.
- All details — including Company, Contact, Billing, Shipping, and Tax (based on the Shipping Address) — will be automatically filled according to the company setup.
2. Quotation details
2.1 General Detail

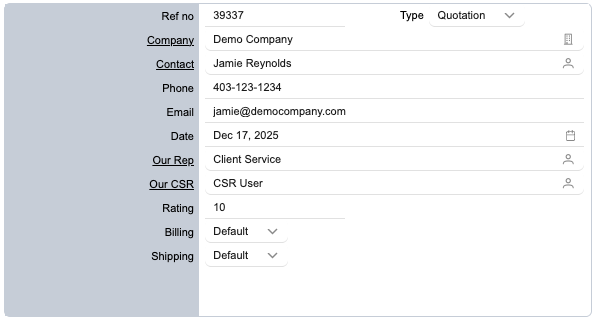
- Ref no: Automatically generated by the system; cannot be edited.
- Type:
The type ofDefines the quotation.quotation type. - Company: The company
associatedlinked withto the quotation,quotation. whichThis willis auto-fill by the system,filled, but usersyou can change thatit detail.by clicking the  company icon.
 - Contact: The primary contact
person for the job.quotation. This field is auto-filled based onfrom the company'company’s default contact.contact, and can be changed by clicking the  contact icon.
 - Phone: Auto-filled
based onfrom the selected contact’s phone number. - Email:
The email address for the quotation, auto-Auto-filled from the selected contact.contact’s email address. - Date: The date the quotation is created. You can change it by clicking the
 calendar icon
 - Our Rep:
WhoThe assigned company representative. This is pulled from the company representativesettings, but you can change it using the contact icon . - Our CSR:
WhoThe assigned customer service representative. Also pulled from the company settings and editable via the contact icon . - Rating: The company’s rating, automatically calculated by the system and not editable.
- Billing: The billing mode, set to the company default but adjustable if needed.
- Shipping: The shipping mode, set to the company default but can be changed as required.
2.2 Billing Detail
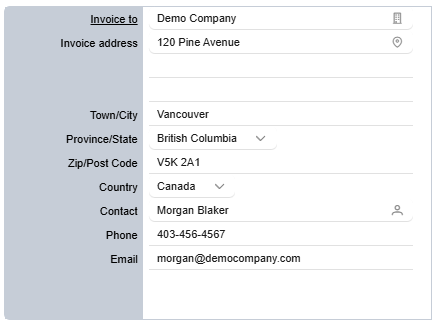
- Invoice to: The company responsible for billing. By default, this is the
company'squotation CSR.company, but you can assign billing to a different company by clicking the company icon. JobInvoice typeAddress: The typesystem ofautomatically selects the job.company’s billing address. If no billing address is defined, the company’s default address is used instead. Adjustments are available through the  address icon.
- Contact: The system prioritizes the Accounts Payable contact. If none is available, it uses the selected billing contact. If neither exists, the quotation contact is used. The contact may be updated using the contact icon
2.3 Shipping Detail
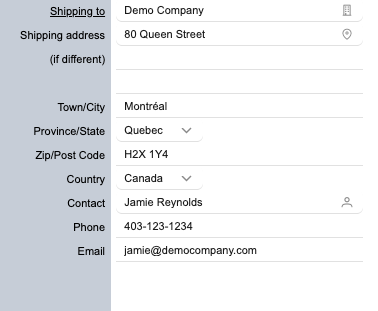
- Shipping to: The company responsible for shipping. By default, this is the quotation company. A different company can be selected using the company icon.
- Shipping Address: The system automatically selects the company’s shipping address. If no shipping address is defined, the company’s default address is used instead. Another address may be selected through the address icon.
- Contact: The system prioritizes the shipping contact. If neither exists, the quotation contact is used. Use the contact icon to select a different contact.
2.4 Details
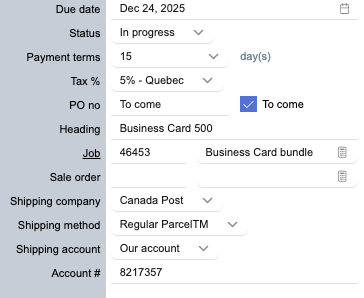
- Due date: Automatically set to 7 days. A different date can be selected using the calendar icon
- Status:
TheIndicates the current status of the job.quotation. EmailPayment terms: The email address for the job, auto-filledPulled from the selectedcompany contact.settings, with the option to select a different term if required.Company phoneTax%: Auto-filledCalculated based on the selectedprovince company’s phone number.Direct phone: The contact’s direct line, auto-filled fromof the selectedshipping contact.Mobile: The contact’s mobile number, auto-filled from the selected contact.Fax: The company’s fax number, auto-filled from the selected company.address.- PO
nono: : Enter the purchase order number. IfSelect it's“To Come” if it has not been received yet. - Heading: A short description to help your team easily recognize the quotation.
- Job: The job linked to this quotation. Selection is available
yet,via the  document icon
 - Sale order: The sales order linked to this quotation. Selection is available via the document icon
- Shipping company: Automatically selected from the company settings.
- Shipping method: Automatically selected from the company settings.
- Shipping account: Automatically selected from the company settings.
- Account #: Automatically selected from the company settings.
3. Line Entry
3.1 Add a Line Entry
- Click the plus icon located in the quotes header, and a new line will be added to the table
- Click Change Option to select the product.
- Using the search on the top to filter a specific product, after that, click on Product to add to the Line Entry
To3.2 ComeUpdate Line Entry.