Quotation Entry
1. Create a new quotation
1.1. Creating a quotation without a job
- Navigate to the Quotes tab in the middle menu of the Company module (see more details in the Company quotation).
- Click the
 plus icon located in the quotes header.
 - All details — including Company, Contact, Billing, Shipping, and Tax (based on the Shipping Address) — will be automatically filled according to the company setup.
1.2. Creating a quotation in the job
- Navigate to the Quotes tab in the middle menu of the Job module (see more details in the Job quotation).
- Click the plus icon located in the quotes header.
- All details — including Company, Contact, Billing, Shipping, and Tax (based on the Shipping Address) — will be automatically filled according to the company setup.
2. Quotation details
2.1. General Detail
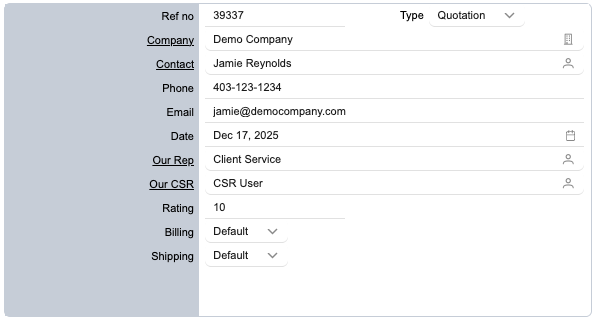
- Ref no: Automatically generated by the system; cannot be edited.
- Type: Defines the quotation type.
- Company: The company linked to the quotation. This is auto-filled, but you can change it by clicking the
 company icon.
 - Contact: The primary contact for the quotation. This is auto-filled from the company’s default contact, and can be changed by clicking the
 contact icon.
 - Phone: Auto-filled from the selected contact’s phone number.
- Email: Auto-filled from the selected contact’s email address.
- Date: The date the quotation is created. You can change it by clicking the
 calendar icon
 - Our Rep: The assigned company representative. This is pulled from the company settings, but you can change it using the contact icon .
- Our CSR: The assigned customer service representative. Also pulled from the company settings and editable via the contact icon .
- Rating: The company’s rating, automatically calculated by the system and not editable.
- Billing: The billing mode, set to the company default but adjustable if needed.
- Shipping: The shipping mode, set to the company default but can be changed as required.
2.2. Billing Detail
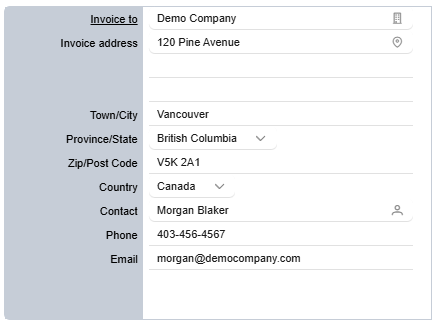
- Invoice to: The company responsible for billing. By default, this is the quotation company, but you can assign billing to a different company by clicking the company icon.
- Invoice Address: The system automatically selects the company’s billing address. If no billing address is defined, the company’s default address is used instead. Adjustments are available through the
 address icon.
 - Contact: The system prioritizes the Accounts Payable contact. If none is available, it uses the selected billing contact. If neither exists, the quotation contact is used. The contact may be updated using the contact icon
2.3. Shipping Detail
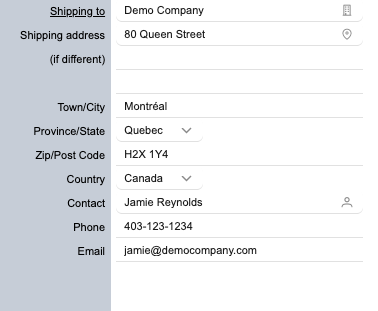
- Shipping to: The company responsible for shipping. By default, this is the quotation company. A different company can be selected using the company icon.
- Shipping Address: The system automatically selects the company’s shipping address. If no shipping address is defined, the company’s default address is used instead. Another address may be selected through the address icon.
- Contact: The system prioritizes the shipping contact. If neither exists, the quotation contact is used. Use the contact icon to select a different contact.
2.4. Details
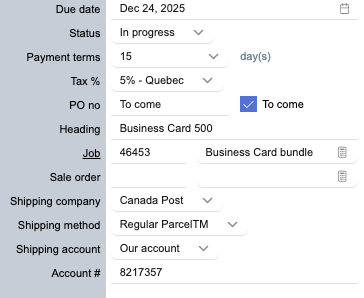
- Due date: Automatically set to 7 days. A different date can be selected using the calendar icon
- Status: Indicates the current status of the quotation.
- Payment terms: Pulled from the company settings, with the option to select a different term if required.
- Tax%: Calculated based on the province of the shipping address.
- PO no: Enter the purchase order number. Select “To Come” if it has not been received yet.
- Heading: A short description to help your team easily recognize the quotation.
- Job: The job linked to this quotation. Selection is available via the
 document icon
 - Sale order: The sales order linked to this quotation. Selection is available via the document icon
- Shipping company: Automatically selected from the company settings.
- Shipping method: Automatically selected from the company settings.
- Shipping account: Automatically selected from the company settings.
- Account #: Automatically selected from the company settings.
3. Line Entry
3.1. Add a Line Entry
- Click the plus icon located in the quotes header, and a new line will be added to the table
- Click Change Option to select the product.
- Using the search on the top to filter a specific product, after that, click on Product to add to the Line Entry
3.2. Update Line Entry
After adding a line item, you can update the product options, size (for products with custom sizing), and quantity. Pricing will automatically update based on your selections
3.3. Duplicate Line Entry
Simply click the ![]() duplicate icon on the line you want to copy.
duplicate icon on the line you want to copy.
To save time, you can duplicate an existing line instead of re-entering sizes and options.
This is useful when you want to compare pricing at different quantities, or keep the same quantity while changing options—such as switching from double-sided to single-sided printing.
You can duplicate a line as many times as needed within a quotation.
3.4. Delete Line Entry
Simply click the ![]() delete icon on the line you want to delete.
delete icon on the line you want to delete.
3.5. Quotation Analytic
As a manager, the Analytics feature provides a clear overview of the quotation, helping you make informed decisions before approval.
Click the Analytics button to open this feature.
4. Quotation Costing
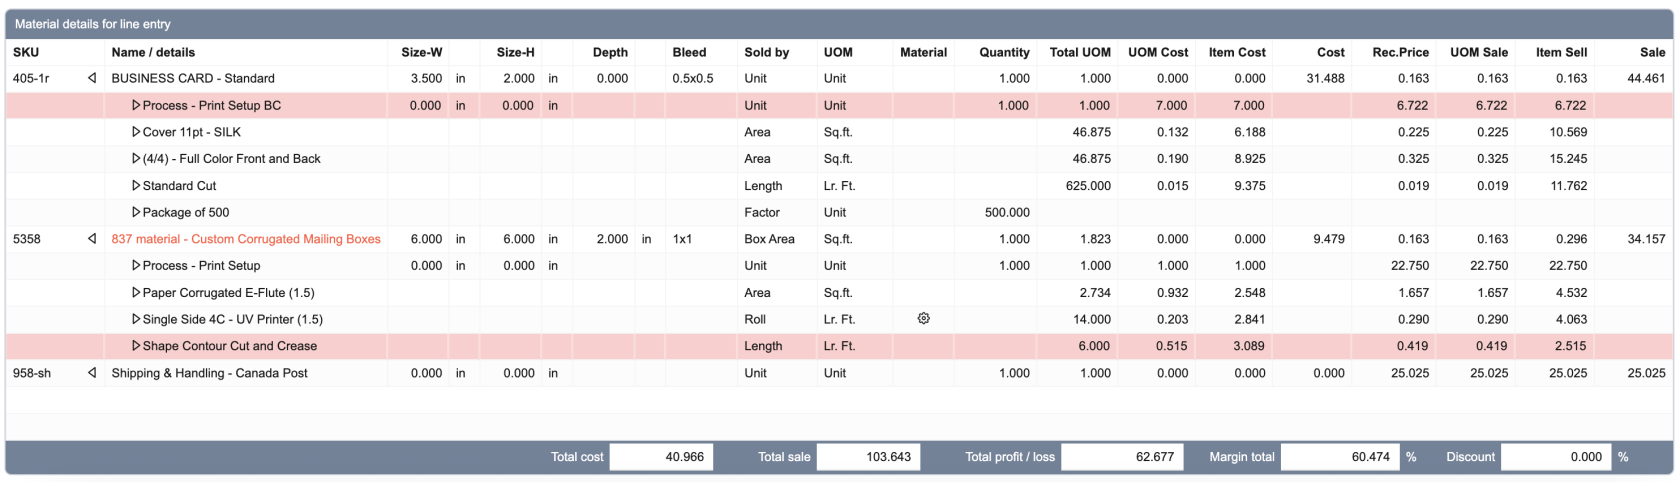
Each quotation provides detailed—down to very detailed—costing insights, giving you a clear view of the profitability of the quotation.
- Red highlighted lines: Indicate items with a negative cost. Adjust the selling price to restore pricing balance.
- Red product name: Indicate products that have not yet been approved.
- Material icon
 : Appears when a product’s pricing is calculated based on material cost.
At the summary level, you’ll see:
- Total cost: The total cost of all items in the quotation.
- Total sale: The total selling value of the quotation.
- Total profit/loss: A positive value indicates profit, while a negative value indicates a loss.
- Margin total: Displays the overall margin percentage for the quotation. This helps you determine whether additional discounts can be applied.
- Discount: Enter a percentage here to apply a discount across the entire quotation.
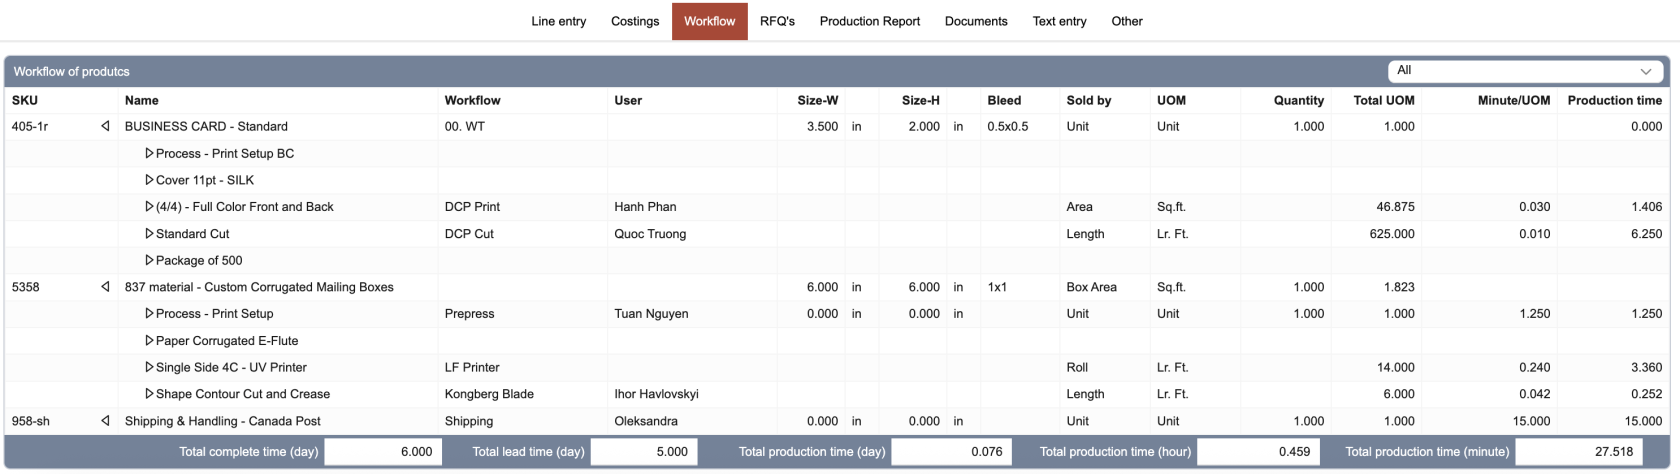
5. Quotation Workflow
This section provides a summary of the entire quotation workflow.
It shows how many assets are involved in this quotation and outlines the full timeline, including production time, lead time, and the total number of days to completion.
6. Quotation Quick Action
6.1. Duplicate quotation
To save time when creating a similar quotation with accurate pricing, you can duplicate an existing quotation by following these steps:
- Go to the Other tab.
- On the left side, you’ll see the Quick Actions panel.
- Under the General section, select Duplicate Current Quotation.
- The system will then ask you to choose whether to keep the existing prices or reset the prices to apply updated pricing.
6.2. Convert a quotation to a sales order (for quotations linked to a job).
- Go to the Other tab.
- On the left side, you’ll see the Quick Actions panel.
- Under the Create section, select Create Sale Order.
- Users have two options:
- Replace an existing SO: Use this option when a customer needs to update a previous sales order.
- New sale order: Use this option to generate a brand-new sales order.
6.3. Convert a quotation to a sales order and job (for quotations without a job).
- Go to the Other tab.
- On the left side, you’ll see the Quick Actions panel.
- Under the Create section, select Create Sale Order and Create Job.