Company Entry
Create a new company
In the system, there is one designated main company—usually representing your own business. Users can also add other companies, such as customers or suppliers.
Company general
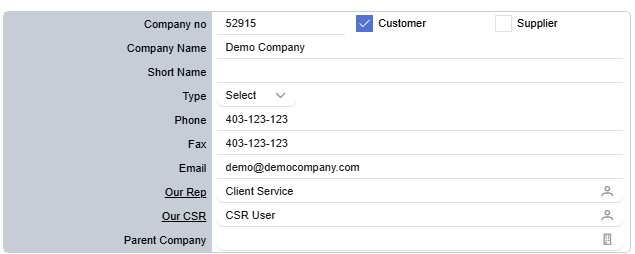
1. Detail:
- Company no: Generated by the system; cannot be edited.
- Customer & Supplier: Select the company profile; both can be chosen.
- Company Name: Enter the company’s full name.
- Short Name: Enter the company’s short name.
- Type: Select the type of company.
- Phone: Enter the company’s phone number.
- Fax: Enter the company’s fax number.
- Email: Enter the company’s email address.
- Our Rep: Click on the
 contact icon to select or update the sales representative.
 - Our CSR: Click on the contact icon to select or update the CSR.
- Parent Company: Click on the
 company icon to select or update the parent company.
2. Default address:
- An address must be created first, then selected as the company’s default address. (To create an address, see Create a new address)
- Users cannot directly create a default address in the default address form.
- Once set as default, the address can be updated directly in the default address form.
3. Shipping info
Each company can set a default shipping method for use in Quotations, Sales Orders, and Sales Invoices. Once configured, the system will automatically include this information whenever a new Quotation, Sales Order, or Sales Invoice is created.
- Shipping company: Select the default shipping company for this company.
- Shipping method: Select the default method (e.g., Standard, Express).
- Shipping account: Choose the account used for shipping.
- Account #: Enter the account number for the shipping account.
Back to the company
In each module, you can see the linked company. Clicking the link will quickly take you back to the associated company for easy access.
Company overview
This tab provides a summary of all overdue Quotations, Sales Orders, Sales Invoices, and Tasks for each company. It helps users stay organized and manage their work efficiently.

Company contact
1. Create a new contact
- Navigate to the Contact tab in the middle menu.
- Click the
 plus icon located in the contact header.
 - Begin filling out the form with the contact’s information (see contact's information in Contact general)
- Note: Contacts linked to the main company are considered employees.
2. Update contact
- Under the Contact tab in the Company menu.
- Update Title, First name, Last name, Position, Default, Billing contact, Unsubscribe & Inactive for each contact:
- Default: Marks this contact as the primary/default contact for the company. Only one default contact is allowed per company.
- Billing contact: If selected, this contact will receive invoices.
- Unsubscribe: When checked, this contact will not receive company updates or newsletters.
- Inactive: Use this option when the contact is no longer with the company to mark them as inactive.
- Delete: Click the image delete icon to remove the contact from the system if it was created by mistake or is no longer needed.
3. View contact
Click the ![]() arrow icon in the row you want to view.
arrow icon in the row you want to view.